AAA
Introduction
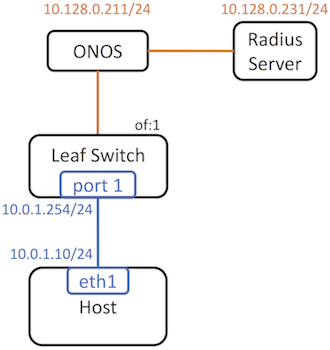
In this section, we will explain how to use Trellis with AAA service, which can be used to authenticate a client host. We will explain how this works with a simple single switch topology.
Configure ONOS
Activate AAA app
We need to install and activate AAA app separately since it is located in a separate (CORD) repository. There are multiple methods to install and activate a pre-compiled app. Let’s use CLI now.
Provide network configuration
We need to provide AAA configuration in the apps section of network configuration.
{
  "apps": {
    "org.opencord.aaa" : {
      "AAA" : {
        "radiusIp": "10.128.0.231",
        "radiusServerPort": "1812",
        "radiusSecret": "howdoyouturnthison"
      }
    }
  }
}
radiusIp: The IP address of the Radius serverradiusServerPort: The UDP port of the Radius server. (Optional – ONOS will use port 1812 by default).radiusSecret: The Radius secret. This needs to be consistent with the Radius server configuration
Then push the JSON to ONOS:
$ onos-netcfg $OC1 aaa-config.json
Configure Radius server
Install FreeRadius
Technically, any Radius server should work. However, the way to configure them are probably different case to case. Here we use FreeRadius on Ubuntu as an example. To install the Radius server, simply run:
sudo apt-get install freeradius
Configure FreeRadius
Add a user
We usually connect Radius server to a database where we store the user
information. In this section, we statically configure a user to simplify the
setup. To add a user admin with password cord_test, edit
/etc/freeradius/users and add following lines:
admin  Cleartext-Password := "cord_test"
       Reply-Message = "Hello, %{User-Name}"
Allow external clients
By default the Radius server only accepts requests from localhost.
To allow external clients, we need to modify /etc/freeradius/clients.conf
We also need to change the secret.
-client localhost {
+client 0.0.0.0/0 {

-       secret          = testing123
+       secret          = howdoyouturnthison
Use TLS
By default, FreeRadius use MD5 challenge response to authenticate clients.
To use TLS, we need to modify /etc/freeradius/eap.conf
We also need to change the private key password.
-               default_eap_type = md5
+               default_eap_type = tls

-                       private_key_password = whatever
+                       private_key_password = onos_test
Note
The key and certificates required by TLS will locate under
/etc/freeradius/certs by default. There will be three symbolic links
link to ca.pem, server.key, server.pem. We only need to change
the symbolic links after we generates the keys and certificates.
Therefore, we don’t need to change the path in /etc/freeradius/eap.conf
Note
Both server certificate and client certificate need to be signed by the same CA certificate. Also note that each key we generate below needs a unique Common Name.
Generate CA certificate (ca.pem) and private key (privkey.pem)
openssl req -out ca.pem -new -x509
Generate and sign server certificate (server.pem) and private key (server.key)
openssl genrsa -out server.key 1024
openssl req -key server.key -new -out server.req
openssl x509 -req -in server.req -CA ca.pem -CAkey privkey.pem -CAserial file.srl -out server.pem
Generate and sign client certificate (client.pem) and private key (client.key)
openssl genrsa -out client.key 1024
openssl req -key client.key -new -out client.req
openssl x509 -req -in client.req -CA ca.pem -CAkey privkey.pem -CAserial file.srl -out client.pem
Deploy keys and certificates
On the server side, please link /etc/freeradius/{ca.pem, server.key, server.pem} to the files we just generated. Also copy ca.pem, client.key, client.pem to the client side through a secured channel. They will later be used when testing the Radius authentication.
Testing
We can use the wpa_supplicant as the test client. In case
wpa_supplicant has not been installed, you can run sudo apt-get install
wpasupplicant
Compose wpa_supplicant.conf
ctrl_interface=/var/run/wpa_supplicant
eapol_version=1
ap_scan=0
fast_reauth=0
network={
    key_mgmt=WPA-EAP
    eap=TLS
    identity="admin"
    password="cord_test"
    ca_cert="ca.pem"
    client_cert="client.pem"
    private_key="client.key"
    private_key_passwd="onos_test"
    eapol_flags=3
}
Run the test client
Tip
If you are using a Linux VM behind a bridge to send out this authentication message, make sure the Linux kernel of your host machine is 3.2 or above. Otherwise the EAPOL messages won’t go through the bridge.
$ sudo wpa_supplicant -Dwired -ieth1 -cwpa_supplicant.conf
You should see the following message if authentication succeed:
Successfully initialized wpa_supplicant
eth1: Associated with 01:80:c2:00:00:03
eth1: CTRL-EVENT-EAP-STARTED EAP authentication started
eth1: CTRL-EVENT-EAP-PROPOSED-METHOD vendor=0 method=13
eth1: CTRL-EVENT-EAP-METHOD EAP vendor 0 method 13 (TLS) selected
eth1: CTRL-EVENT-EAP-PEER-CERT depth=1 subject='/C=US/ST=CA/L=Menlo Park/O=ON.Lab/CN=ca.cord.lab/emailAddress=xxx@xxx.xxx'
eth1: CTRL-EVENT-EAP-PEER-CERT depth=0 subject='/C=US/ST=CA/L=Menlo Park/O=ON.Lab/CN=server.cord.lab/emailAddress=xxx@xxx.xxx'
eth1: CTRL-EVENT-EAP-SUCCESS EAP authentication completed successfully